Happy May, everyone!
I’ve seen this question popping up quite a bit recently and thought it would make a worthwhile blog post.
There are certainly a number of different ways to approach this, but I have what I think is the most convenient long term solution. Instead of putting the agent installer, in the form of EXE or MSI within Intune, we can package up a PowerShell script that always downloads the most up to date agent. This has the huge benefit of meaning the package in Intune never has to be updated as a newer version of the Agent are released.
Getting Started
First you need to generate an installer token. This token will be utilised in the PowerShell script to allow it to download and install the agent on the machine. Note this token is not allowing blanket access to your Automate, it’s just allowing the requester to see things like your agent installer. Fortunately the legend that is Darren White has put together an Automate script to easily generate the token. You’ll find it here: https://forums.mspgeek.org/files/file/50-generate-agent-installertoken/
Putting together the PowerShell Script
The next step is to create the PowerShell script. Create a file called install.ps1 with the following content. Replace the server with the URL to your Automate server, and put your generated token in to the InstallerToken parameter. Also note you can set the LocationID to whatever you need depending on the company you are deploying to. This is the ID that appears in Automate next to a location (if you can’t see that see your settings in the top right of the Automate thick client and choose to turn on Show IDs).
iex (new-object Net.WebClient).DownloadString('https://bit.ly/LTPoSh'); Install-LTService -Server 'https://your.automate.url' -LocationID 2 -InstallerToken 'YOURTOKENHERE' -Force
It’s important you understand what this is doing. The DownloadString component is essentially pulling the LabTech PowerShell Module at https://raw.githubusercontent.com/LabtechConsulting/LabTech-Powershell-Module/master/LabTech.psm1 in to memory and executing it on whatever machine you deploy to. If you’re utilising this article to install the Automate Agent, you absolutely should consider forking this repository yourself and replacing the DownloadString URL with one you control. The above WILL work, though you’re essentially letting a third party control PowerShell content that is running on your agents which is a VERY BAD IDEA. Simply link your own psm1 that you fork in the same format as https://raw.githubusercontent.com/LabtechConsulting/LabTech-Powershell-Module/master/LabTech.psm1 but just in your own Github repository.
Create a filed called uninstall.ps1 and put the following inside:
iex (new-object Net.WebClient).DownloadString('https://bit.ly/LTPoSh'); Uninstall-LTService -Server 'https://your.server.url' -Force
The same advice applies as above.
Intune Packaging
We now need to package this script in a format that can be imported in to Intune. This involves generating a .intunewin file. The URL here explains the process in details Prepare a Win32 app to be uploaded to Microsoft Intune | Microsoft Docs but the long and short of it is place the PS1s created above in their own folder, download the IntuneWinAppUtil.exe at GitHub – microsoft/Microsoft-Win32-Content-Prep-Tool: A tool to wrap Win32 App and then it can be uploaded to Intune then run it, point it at the source folder, choose an output folder and that’s it – you have an intunewin file that can be imported in to Intune.
Intune Deployment
Navigate to https://endpoint.microsoft.com, and go to Apps, then All Apps. Click Add.

Select Windows app (Win32) as the App type.
In Step 1, upload your .intunewin file.
Add a Name, Description and Publisher at a minimum. I would recommend putting effort in to doing this properly, including putting a Logo in place though all that’s strictly necessary is Name, Description and Publisher. Choose Next.
In Install command add:
powershell.exe -executionpolicy bypass .\install.ps1
In Uninstall command add:
powershell.exe -executionpolicy bypass .\uninstall.ps1
For install behaviour, choose System.
If you’re dealing with something that can give specific return codes then you can enter them here, or leave them as default. Choose Next
In Requirements set the limitations you want to apply. For the Automate Agent you can select 64-bit and 32-bit for Operating system architecture. You will need to select a minimum operating system also.
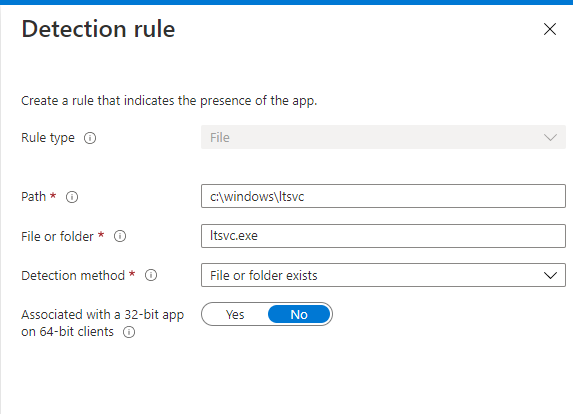
In Detection Rules, choose Manually Configure Detection Rules and click Add. In rule type select File, and in Path place c:\windows\ltsvc. In File or Folder type ltsvc.exe and a detection method of File or Folder exists. Choose No to associate with a 32 bit app on 64 bit clients.

Step 5 gives you the ability to add dependencies. For the Automate Agent nothing is required here.
Step 6 allows you to apply supersedence, again for the Automate Agent nothing is required here.
Step 7 assignments is self explanatory and lets you target the install, making it optional or required. Scope it how you wish. I scope it to All users.
Review and Save, and that’s it!
If you have problems with deployment see https://docs.microsoft.com/en-us/troubleshoot/mem/intune/troubleshoot-app-install
You can force a sync in the Company Portal App or just restart the Microsoft Intune Management Extension service.


Thank you for writing this up.
When generating the Intunewin file, what do you specify for the setup.exe when prompted?
Thanks.
If you look at the Two PowerShell Commands provided in the article, you will see that they both reference a different PowerShell Function, “Install-LTService” and “Uninstall-LTService”, immediately after referencing the LTPosh Module URL.
First, you will want to Copy/Paste the Command, which contains the “Install-LTService” reference, into a PowerShell Script File, titled “Install.ps1”.
Next, you will want to Copy/Paste the Command, containing the “Uninstall-LTService” reference, into a PowerShell File, titled “Uninstall.ps1”.
When you Run the Command to Build your Win32 Package, you will want to Point the -s Parameter to your “Install.ps1” File (as opposed to a setup.exe or MSI Installer, etc).
Example:
IntuneWinAppUtil -c “\\Path\To\Source\Folder” -s “\\Path\To\Install.ps1” -o “\\Path\To\Destination\Folder”
For future reference, you’ll normally want to point the -s Parameter to the Primary Application Installer, whether it be an EXE or MSI Installer, a Script (PS1, BAT, VBS, etc), etc.
I hope this helps to better explain the process, a bit.
Hello,
and thank you for this post!
I’m testing it a bit and it works almost fine for me …
Installing via powershell directly on the PC-client is full successful (installed and registered), but not when PS pushes via Intune. The installation process via intune itself was successful, but the agent was not registered due to some error. Any tips?
BR,
Remi
maybe I found a solution, deploy install.ps1 just as a script and not a Windows apps (Win32) . I have to more test, but it works for me now.
Log error: Install-LTService: Error: Line 1390: LabTech installation completed but Agent failed to register within expected period.
The Error seems to suggest that the Agent was having trouble Registering with the Connectwise Automate Database before Timing Out.
If you’re having trouble with the Automate Deployment Script, provided in the Article, perhaps you might want to try the “Automate-Module”, developed by “Braingears”. You can find this Module, by following the Link below.
Github – Braingears – Automate Module:
https://github.com/Braingears/PowerShell/blob/master/Automate-Module.ps1
This Script works similarly, as you need to provide your Automate Server URL, the Location ID as well as a 128-bit Installer Token.
Invoke-Expression(New-Object Net.WebClient).DownloadString(‘https://raw.githubusercontent.com/Braingears/PowerShell/master/Automate-Module.ps1’); Install-Automate -Server -LocationID -Token -Transcript
I should also Note that by Default Automate Installer Tokens will Expire within 24 Hours, I believe. Therefore, you may also want to Install the “Agent Installer Token Generator” Script, written by “DarrenWhite99”. This Script will allow you to Generate Installer Tokens, with Expiration Dates on 1 Year or more.
mspgeek.org Forums – DarenWhite99 – Automate Agent Installer Token Generator Version 1.4.1:
https://forums.mspgeek.org/files/file/16-powershell-deployment-scripts/
I hope this helps!
The Error you posted seems to suggest that the Agent was having trouble Registering with the Connectwise Automate Database before Timing Out.
If you’re having trouble with the Automate Deployment Script, provided in the Article, perhaps you might want to try the “Automate-Module”, developed by “Braingears”. You can find this Module, by following the Link below.
Github – Braingears – Automate Module:
https://github.com/Braingears/PowerShell/blob/master/Automate-Module.ps1
This Script works similarly, as you need to provide your Automate Server URL, the Location ID as well as a 128-bit Installer Token.
Invoke-Expression(New-Object Net.WebClient).DownloadString(‘https://raw.githubusercontent.com/Braingears/PowerShell/master/Automate-Module.ps1’); Install-Automate -Server -LocationID -Token -Transcript
I should also Note that by Default Automate Installer Tokens will Expire within 24 Hours, I believe. Therefore, you may also want to Install the “Agent Installer Token Generator” Script, written by “DarrenWhite99”. This Script will allow you to Generate Installer Tokens, with Expiration Dates on 1 Year or more.
mspgeek.org Forums – DarenWhite99 – Automate Agent Installer Token Generator Version 1.4.1:
https://forums.mspgeek.org/files/file/16-powershell-deployment-scripts/
I hope this helps!
My apologies!
It seems that I Copied/Pasted the wrong URL, to the Automate “Agent Installer Token Generator” Script Download Page.
Below you will find the Correct URL to the Script, in question.
mspgeek.org Forums – DarenWhite99 – Automate Agent Installer Token Generator Version 1.4.1:
https://forums.mspgeek.org/files/file/50-generate-agent-installertoken/
Hey Gavsto,
Great stuff! However, the instructions are unclear at best and incomplete at worst. The intunewin packaging part needs work. You can’t just package a folder of files, you need a source file like a .cmd or something to actually run the command.
The scripts would change to add parameters and combine to a single file, then you would put the install/uninstall commands into separate CMD files, then package that with the ps1 as the source file.
Then, in Intune, you would call the install/uninstall like : install.cmd or uninstall.cmd
Here is a link to an example of how it can work : https://www.risual.com/2019/02/add-powershell-script-to-intune-company-portal/
I hope this helps some people looking for this.
Also, the part about generating the token was tough to figure out. I just took the script by Darren, removed the “Function” aspect of it by unchecking the box, then ran it on any online computer. It sent me an email with me details.
Brandon is correct. You cannot just package a folder containing a bunch of files, etc.
However, there is a little trick that I tend to use in various circumstances, which I would like to share.
When you define the Setup File, using the -s Parameter, the Path doesn’t have to lead to an EXE or MSI File, in particular.
With that being said, you can actually create a blank TXT File in your Source Folder, to which you can point, using the -s Parameter, as you Build your Win32 Package.
Example:
IntuneWinAppUtil -c “C:\Path\To\Source\Folder” -s “C:\Path\To\Blank\TXT\File” -o “C:\Path\To\Destination\Folder”
I actually had to utilize this method recently, while packaging the Microsoft Teams Machine-Wide Installer as a Win32 Package for Deployment, via Intune.
The problem with the Teams Machine-Wide Installer is that Intune will Automatically Set the “Install Behavior” Option to Install “User”, which could not be changed, since it was grayed out. This was causing all sorts of problems for our users, especially when it came to Automatic Updates and the like.
To get around this Issue, I simply utilized the aforementioned method, using a blank .TXT File, which allowed me to set the “Install Behavior” to “System”, as required.
Thus far, the results have been completely positive, as this has had No Negative affects in relation to the rest of the Win32 Package Setup Process or the Final Outcome.
Anyways, I hope this helps someone out, who might be having similar issues.
Heads up by default the latest script to generate the token caps out at 53 weeks. To fix to make longer go in and edit the line
SELECT ROUND(DATE_ADD(UTC_TIMESTAMP(),INTERVAL 53 WEEK)+0,0);
and replace 53 WEEK with XX YEAR or whatever you want to get it for more than 52 weeks
So does this process work or not?
No replies from the big guy himself on the comments that this will not work
Hi Smeagle,
Late response I know! Not sure everyone reads the comments.
Yes this process works. I have successfully deployed the Automate agent to multiple clients via Intune using the above process. I dont use the token meathod and instead use the server password. Probaby frowned apon but it works for me and if the password changes it will be becuase we decided to do it knowing the impact.
I also specifcy the source file as the install.ps1 script with its full path but I dont think it is required as the install command specififys this script anyway.
Hope this helps, even if it is a little late!
Hi, I need help with the part about generating an installer token. I’m not familiar with running scripts within Automate. I have gone to https://forums.mspgeek.org/files/file/50-generate-agent-installertoken and downloaded the xml file. I’m just not sure what to from here. If anyone can point me in the right direction that would be greatly appreciated.
How can this be done just with the Control Agent only? We don’t leverage Automate, so curious if there’s a process in which this can work specifically for just the control agent to maintain it being updated.
Hi Everyone,
We just deployed this in our environment, and it is working like a charm. However, I was wondering how we can revoke the token. In the event that the token has been leaked or I would just like to stop it from installing via the script, is there a way to revoke a specific token? Any help is much appreciated.
You can simplify this and make it more modular by creating Run.ps1 with the following contents
param(
[Parameter (Mandatory = $false)] [String]$LTPoSh = ‘https://bit.ly/LTPoSh’,
[Parameter (Mandatory = $false)] [String]$Server = ‘https://your.automate.url’,
[Parameter (Mandatory = $false)] [String]$LocationID = ‘2’,
[Parameter (Mandatory = $false)] [String]$InstallerToken = ‘$null’,
[Parameter (Mandatory = $false)] [String]$Command = ‘$null’
)
iex (new-object Net.WebClient).DownloadString($LTPoSh); iex $Command
Install command would be:
powershell.exe -executionpolicy bypass .\Run.ps1 -Command {Install-LTService -Server $Server -LocationID 2 -InstallerToken $InstallerToken -Force}
Uninstall command would be:
powershell.exe -executionpolicy bypass .\Run.ps1 -Command {Uninstall-LTService -Server $Server -Force}
Key benefit is that you can now pass whatever command you want to the module and also embed defaults like the server address or module address without having to repackage it.
You can then reuse that package with other clients and have the flexibility of specifiying a different token for each client and renew that token without a repackage.
The following command will perform a reinstall of an existing agent, which can be handy within a compliance script should there be a broken agent install:
Redo-LTService -Server $Server -LocationID $LocationID -InstallerToken $InstallerToken -Force
For whatever reason, PS doesn’t like the -Command options being passed, so I ended up with a “best of both worlds”;
2 scripts – Install.ps1, Uninstall.ps1, using the variables you defined, but no $Command;
Install.ps1:
param(
[Parameter (Mandatory = $false)] [String]$LTPoSh = ‘https://bit.ly/LTPoSh’,
[Parameter (Mandatory = $false)] [String]$Server = ‘https://your.automate.url’,
[Parameter (Mandatory = $false)] [String]$LocationID = ‘2’,
[Parameter (Mandatory = $false)] [String]$InstallerToken = ‘$null’
)
iex (new-object Net.WebClient).DownloadString($LTPoSh);
Install-LTService -Server $Server -LocationID $LocationID -InstallerToken $InstallerToken -Force
Uninstall.ps1:
param(
[Parameter (Mandatory = $false)] [String]$LTPoSh = ‘https://bit.ly/LTPoSh’,
[Parameter (Mandatory = $false)] [String]$Server = ‘https://your.automate.url’,
[Parameter (Mandatory = $false)] [String]$LocationID = ‘2’,
[Parameter (Mandatory = $false)] [String]$InstallerToken = ‘$null’
)
iex (new-object Net.WebClient).DownloadString($LTPoSh);
Uninstall-LTService -Server $Server -Force
Bundled into an Intunewin, then in the app settings;
Install command: powershell.exe -executionpolicy bypass .\Install.ps1 -LocationID XX -InstallerToken YY
Uninstall command: powershell.exe -executionpolicy bypass .\Uninstall.ps1
This means the app/bundle can be client/site dependant and easily updatable for token expiry.
I like your improvements, this does make the install command a little simpler and cleaner.
The app bundle was already client/site dependent as all you would need to do is replace the “$InstallerToken” and LocationID number with your actual token and location number in the install command when configuring the application.
The way I had written it has used a single PowerShell script rather than a separate install and uninstall. Admittedly, this was because I had used this script for other implementations outside of Intune and wrote if for maximum flexibility to be able to use other module commands, but since the package will only need to run install or uninstall having two nearly identical scripts is a good tradeoff for a simpler command.
Its also probably a bit more secure now since you can only run these two specific commands instead of literally anything.